Job Style Orders
A job style order only lists a single job and omits the underlying line-item details. For example, a job can include several products, plus various services, freight, labor etc. On regular orders, all line items are listed, followed by a total. A job style order lists just a description of the job (to whatever level of detail you want to include) and an overall job total. Job style orders are controlled by the special J* F6 Miscellaneous prefixes.
- On the order detail line in order entry, press F24 to access the Additional Functions screen. Select option F19=Job Style Order.
- The Job Style order entry screen works very similar to multi-line order entry allowing you to enter items, quantity, etc.
- The following options are available:
- I - Check inventory details about a specific item. The inventory window displays availability by serial number within each warehouse. Inventory Available (Inv Avail) is defined as: onhand inventory - (allocated + held inventory), excluding back orders. It is displayed using the native UM.
- R - Shows material that is related to an item. This option can be used to replace items that do not have any inventory on hand.
- ? - To search for and add items enter a ? next to any empty line. The Item Search is disÂplayed. Search for and select an item to include it in the job style order.
- F2 - If you want to display the items differently (expand the description), press F2. The screen shows the full item descriptions.
- The R field indicates a restriction and is used primarily for rolled goods. Some codes include:
- C = cut
- M = mid price
- R = roll
- B = roll balance
- The Rcv setting provides information about how the item is received or handled. Valid codes in this field include:
- Y - Add the quantity back into inventory. Can be used for credits or returns.
- N - Do not adjust inventory
- B - Used for back ordering an item that is not in stock at this time.
- T - Transfer - This option prevents warehouse personnel from attempting to pull from stock at your warehouse. They will know to expect a transfer. The T also causes this item to appear on the Transfer List at the warehouse that has this material whose warehouse number you should have entered on this line.
- CC indicates the credit or commission code. This field is primarily used for credits. Each code represents the reason or category of the credit. These codes are user-defined in the Classification Codes File. You may also use this code to identify unusual sales for the sake of adjusting commissions, and for sales analysis. For example, you could define code Z as the blow out price indicator for low or negative gross profit sales. These sales are highlighted on daily registers and can be separately analyzed on many reports and screens. This field is also a Commission Exception File field, which means that the commission system can be set to adjust commission for these lines accordingly. Some example codes are:
- P - Pricing Error
- S - Shipping Error
- Y - Blow Out 3%
- After entering all the items, press Enter. If you have ISO activated, the next screen presents ISO inventory selections.
- Press Enter to accept ISO's selection and proceed to the Job Style Order Variance screen.
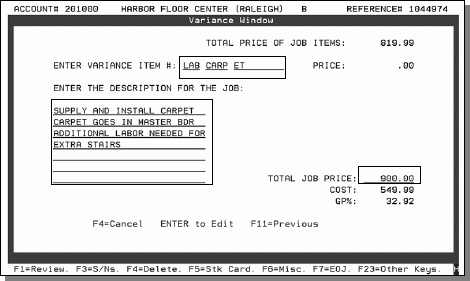
- This screen allows you to override the price (on labor items only) and to provide a description for the job. The description lines are created as J* (job style) messages which means the messages will print on related documents.
- Press Enter to refresh the screen into edit mode and make the necessary changes. In the following example, a Variance Item number (only labor items can be entered as variance items) was entered, the Total Job Price was increased to 900.00 and a few comments were made.
- Press Enter. The system calculates the variance price and recalculates the GP%.
- Press F7 to generate the Job Style order lines group and return to the order detail.
- After the last inventory line, the job style order entry feature automatically enters the job descriptions and the job price supplied on the Variance screen. The total price of the job group is placed on the eighth line of the groups F6 Miscellaneous Comments screen. This leaves the ninth line free to start another group if needed.
- Multiple order line groupings can be entered on one Job Style order. Try to avoid starting a new order grouping in the middle of a series of already used order lines. This can result in the over typing of order lines.
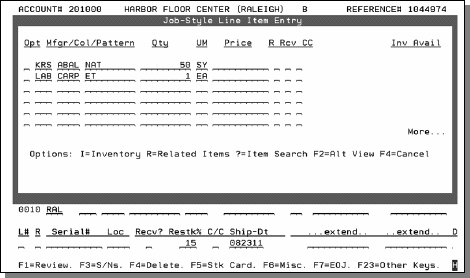
This field relates only to the price required, except for B which also automatically changes the quantity to be equal to the balance of the serial number selected. A B provides the roll price and takes full remaining quantity of the selected serial number. An R gives the roll price even if the quantity is for a cut. A C gives the cut price. An M gives the mid price.
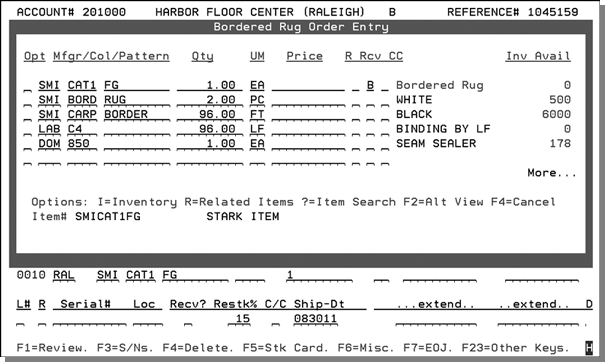
Only the J* comment lines will print on documents. Detail lines will not print.
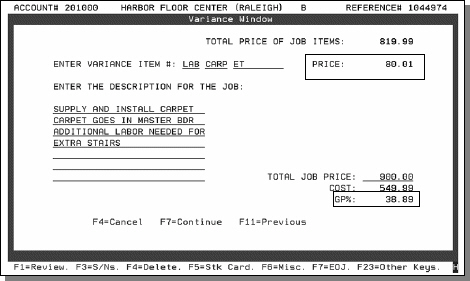
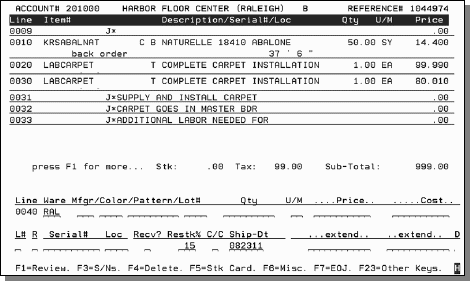
When an order grouping gets to this point it cannot be changed. If changes are required, the grouping has to be deleted and reentered. Additional order groupings can be entered.
Inventory lines are automatically entered as if multi-line order entry was used.
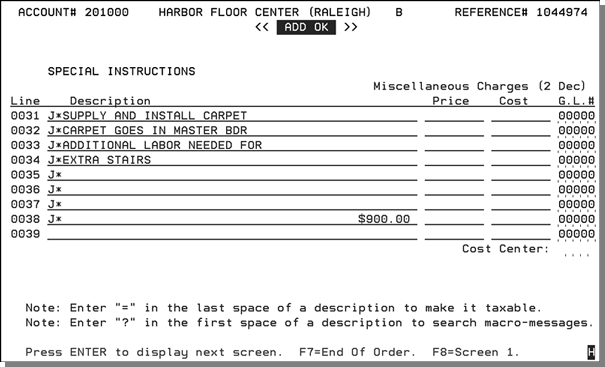
The price shown in the example above ($900.00 on line 38) will appear in the Price column on printed order acknowledgments.
Order Acknowledgments and Invoices
These documents reflect the printing of the price from the comment lines and include the message lines, but no inventory lines. An example order acknowledgment is shown below.
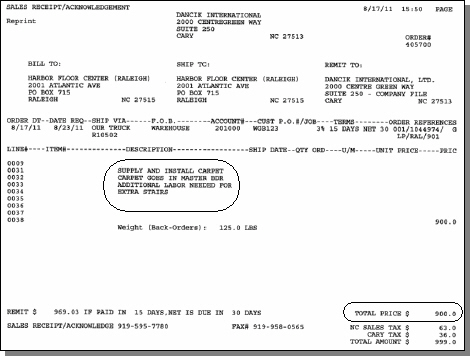
As displayed above, the J* messaging convention prevents any comment lines on orders that are not proceeded with J* from printing on customer facing documents. Detail order lines will not print on orders that use the J* convention.
